 PocketGamer.fun
  U.GG
U.GG  Icy Veins
  Arcade Cloud
  EV.IO
EV.IO How To: Backup an iOS Device to iTunes or iCloud
Need to backup that iOS device? Here's how.

There are many reasons to back up an iOS device. Need to replace that iPhone? Backup and restore! Upgrading to a new iPad? Backup and restore! Sometimes an iOS device just acts weird with no way from the user end to fix them, and a full restore can help a device run in a much smoother manner. As well, the beauty of the restoration process is that a backup can be reinstalled on a completely different device, making upgrading to a new version of the iPhone or iPad easy. It makes upgrading to a new type of device, such as going from iPod touch to iPhone, and even to an iPad possible as well. But how does one go about doing this?
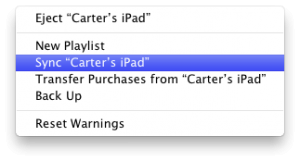 The iTunes backup process is fairly simple. While a backup is created after every device sync, individual full backups can be made by right clicking (or Command-clicking) on the device in the iTunes sidebar, and choosing Back Up. After the lengthy backup process, that backup with its date and time will appear in a list of backups when restoring from iTunes.
iOS 5 introduced iCloud backups and restoring, and these skip iTunes altogether. The advantage to iCloud backup is quite simply that it does not go through iTunes. There’s no weirdness involved with apps and media getting inadvertently deleted from a device unintentionally because iTunes decided to replace them. It’s much more painless when restoring, and handles downloads from multiple iTunes accounts much easier. As well, iCloud backups happen automatically overnight when charging, so if something bad happens, the restored device will not be far out of date.
 The downside is that instead of installing from the computer, it downloads apps from the web, which can take up a long amount of time depending on connection speed and depending on how many apps one is restoring. I have too many apps installed (way more than 148) so I usually leave the process to finish overnight. Note that any media synced from a computer will have to be re-added through iTunes. As well, Apple servers tend to get hammered during new product launches, so early adopters may not enjoy a smooth experience. As well, those who take a lot of photographs and videos will find that the Camera Roll takes up a lot of iCloud space. It becomes a choice between either foregoing backing up the Camera Roll (as individual app backups can be disabled in the iCloud menu) or shelling out for more iCloud space.
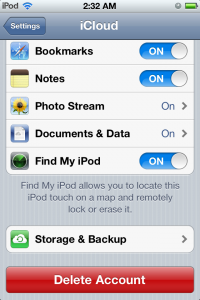
iCloud backups must be enabled by selecting it as the backup method in iTunes. While the iCloud backup process is otherwise automatic, it can also be manually initiated by going to Settings -> iCloud -> Storage and Backup -> Back Up Now.
In order to reset a device to restore it as new from iCloud, go to Settings -> General -> Reset -> Erase All Content and Settings. This will set it up as if it was a brand new device. Enable iCloud while setting back up, choose to restore from iCloud, and choose the name of the device that was backing up to iCloud that you wish to restore from.
