

Dragalia Lost - Ruler of the Shore Guide
The toughest part of every facility event in Dragalia Lost is the pesky wave-based challenge battles. These fights push your Adventurers to the limit with tons of enemies with huge amounts of health that can take you down easily if you’re not careful.
With A Wish to the Wind, this wave-based event is as hard as ever, but it is certainly passable. Check out a few handy tips on how to beat the Ruler of the Shore mission below:
Recommended Adventurers
As a mission full of water enemies, it should go without saying that you’ll want a full team of wind-based Adventurers for A Wish to the Wind, but not all of them are the right choice for the task. For example, any wind Adventurer that doesn’t have bog resistance is probably not as good a pick for your team than one that does. You also want to make sure that your team has a good amount of damage dealers, as every enemy in this mission is a damage sponge.
Recommended wind Adventurers for Ruler of the Shore are listed here, ranked from most useful to least:
- Maribelle: The best wind Aventurer in all of Dragalia Lost. Has bog resistance and huge special attacks that can help with wave clear.
- Musashi: Another huge damage dealer. He also has bog resistance and can poison enemies to do damage over time.
- Lowen: This little guy may not be a damage dealer, but his heals are important to keep your team alive through the whole mission.
- Ranzal: This Adventurer that every player gets for free has a great force strike and also has bog resistance.
Bring Maribelle helper
Almost more important than your Adventurer team for Ruler of the Shore is the helper character you bring with you. If you make room on your friends list for anyone who has a Maribelle helper posted right now, you’ll have a much easier time at beating this tough level.
Maribelle is the best helper for this fight because of her huge area of effect attack she can bring to the fight. This, along with the damage bonuses you receive from A Wish to the Winds’s special structure can allow you to clear whole waves pretty easily.
![]()
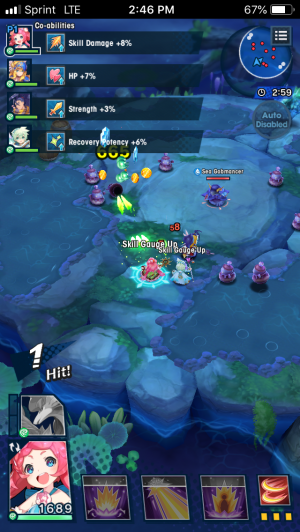
Fight strategy
Getting a solid team and helper can make Ruler of the Shore much easier, but it still won’t make it a cakewalk. Check out tips for each wave to guide you through this tough fight:
- Wave 1: The easiest part of the fight. It’s just some slimes and a single mage enemy. Make sure you focus on the wand unit and your AI companions will probably take out the rest on their own.
- Wave 2: A bunch of flying eyeball creatures with area of effect attacks are most of this wave. Make sure you roll dodge to avoid getting hit. These enemies are still pretty easy to kill without using extra skills and abilities.
- Wave 3: This is where things start to get tough. There’s a bunch of wolves that appear in the upper right section of the map that can be annoying to deal with, but this is where your helper can really bail you out. If you target the right corner of enemies and activate Maribelle’s helper ability, you can take out most of the wave in one shot and mop up the rest easily.
- Wave 4: Things don’t get easier from here. This wave has basilisks with their tricky triangle attacks. Best strategy for dealing with this is to stay out of the middle of the map. Since the basilisks spawn on the edges of the map, you’re surrounded if you stay in the middle.
- Wave 5: This is the last wave with the big bad boss. Although there are some helper enemies here, it’s best to solely focus on the boss. The helpers are huge damage sponges that can slow you down so much that you run out of time. Instead, transform into a dragon and wail on the boss. Also try to time other uses of your Maribelle helper ability and your own character’s moves to help you avoid attacks. If you time things carefully (and maybe get a little lucky), you can clear this final level before dying or running out of time.