 PocketGamer.fun
  U.GG
U.GG  Icy Veins
  Arcade Cloud
  EV.IO
EV.IO How To: Use Shared Photo Streams
Learn how to use an iOS 6 feature that you may not have even known was there: Shared Photo Streams.
One of the features that Apple added into iOS 6 that is kind of hidden away is the new Shared Photo Stream functionality. What this allows you to do is to take photos from your photo library and share them with other people in an album that can be viewed and automatically updated on an iOS device or browsed on the web. Sounds nifty, right? Just one problem: how do you use it? Good question! Apple didn’t exactly put this functionality front and center in iOS 6, but it’s there and it works. Here’s how to start using Shared Photo Streams.
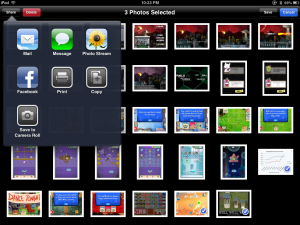
Go to Photos. Go to the album where the photos are stored, such as Camera Roll, though these can be from pretty much any album on the device. Now tap Edit in the upper right corner, and select the photos to be added to a Shared Photo Stream. Once this is done, tap Share, then Photo Stream. Then there’s the option to add them to an existing Photo Stream, or to a New Photo Stream. Tap this to call up a dialogue to where people can be selected to send the stream to, name the stream, and whether to make the stream public.
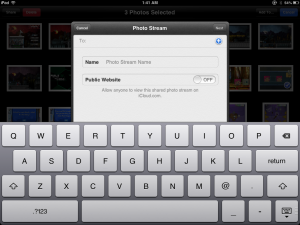 When photos are shared to other people, they can see the entirety of this Photo Stream. When adding addresses, the Contacts list will show those with an actual iCloud ID. Otherwise, these albums can be shared to other people who don’t have iCloud IDs, as they will receive a URL to view this Photo Stream on the web at iCloud.com. People can comment on these photos that are shared. As well, these photos don’t take up any iCloud storage space.
Now, visiting iCloud.com and logging in to your own iCloud account won’t actually show your Photo Stream or any shared albums, even ones that you’ve made public. There is a way to get the URL for easier sharing. On the Photo Stream page, tap Edit in the upper right corner, then tap Share Link. From here, it can be mailed, messaged, tweeted, Facebooked, or copied. The name of the album, new people can be invited, current subscribers can be modified (with their invite status visible), and the album can be set to private.
So, that’s how to use Shared Photo Streams. It’s a little buried, but easy to use. Have any creative uses for them? Let us know in the comments!
