148 Apps on Facebook 148 Apps on Twitter

Category: Photography on iOS »

iPhotographer: Halloween Photo Tips

Posted by Chris Nitz on October 27th, 2010

Halloween is just around the corner (you know, like this weekend), and we all know you will be carrying an iPhone with you from door to door on your candy raids. Maybe you will even have some minions with you doing all the dirty work of begging for candy. Why not put the phone in your pocket to good use and capture a few of these memories in style? A few tips to get you rolling are as simple as:

Snag pics of the kids early
Before you embark out into the night, capture a few shots of everybody in their costumes early. Not only will this net you some much better lighting conditions, but it also allows you to capture photos before everybody is antsy to dive into their buckets of tasty treats. Keep the photos interesting by using various angles and remembering to keep the rule of thirds in place. Keep in mind that head-on shots of kids are ok, but children offset by the pumpkins they carved while standing in front of a big pile of colorful leaves is much more enjoyable. Bonus Tip: You can add on a bit of face manipulation with apps like Kid Face Halloween Edition for that extra bit of Halloween photo fun!

Free studio space in decorated homes
Some people just love to decorate for Halloween. All these decorations mean you have plenty of fun and exciting studio space, minus all the overhead of rent and utilities. Those homes with fun décor are often prime with setups to really enhance your photographs. While you may not want to spend three hours at the same house posing and setting up various shots, you can spend a moment to capture a more intriguing shot. Put the significant other under the giant Black Widow hanging from the tree. Lay the kidlets out in a fake cemetery. People go to great lengths to decorate, why not put those efforts to good use for some memorable Halloween photos. Bonus Tip: Share your best setups with family and friends on Facebook or Flickr while you walk from door to door.

Make use of fun lighting
It maybe dark outside, but you have plenty of great lighting opportunities while out and about collecting the candy tax. Orange, red, and even black lights can turn a drab photo into something exquisite. This is especially true if your child, or even yourself, is wearing something that is black light sensitive. Turn off the flash on the iPhone 4 to help keep these unique colors in your photos. Bonus Tip: you may want to consider stabilizing your phone before taking a photo to help reduce blur.

The most important tip for everything you try to snag on the iPhone this weekend: Have fun. I mean you are out getting free candy and taking great photos. If you are not having fun, you might be doing something wrong!

Apps mentioned in this article:


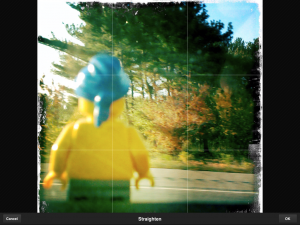
iPhotographer: Break Out Some Angles

Posted by Chris Nitz on October 21st, 2010

One of the simplest ways to increase the visual appeal of your photos is with different points of view. This is possibly the one area the iPhone excels at when it comes to taking photos. The diminutive size, coupled with a large “view finder”, means you can easily play with varying angles to create spectacular, different, and enjoyable photos.

Here is what I mean by changing your angles. We have all seen photos where the subject is straight on, with a relatively generic background. While the scene might be nice, it does not do enough to differentiate itself from the flood of these types of photos online. This is where you, your eye, and a bit of work come into play. Prepare to lie on the ground, climb a tree, and generally look like a goon while you try to catch “the shot.” There is a reason why professionals are willing to lay in the dirt, and that is to create an image that is both pleasing to the eye while providing a different view point to set the photo apart.

Let us take an example of how a simple change of angle creates a more dramatic and interesting photo. Here we start with a photo taken straight on. Sure, the Lego Falcon adds a little to the photo, but the overall feel is a bit bland and over done. We get the idea, but the photo is lacking personality.

Now, take the same setup and change the angle you are going to take the photo. Get in close, get low, go high, go somewhere other than just the run of the mill head on shot. Here are a few examples of the same setup, but with varying angles.

Changing the perspective for a photo works on just about every subject there is for a camera lens. The iPhone camera just lends itself to changing up how you construct your shots. This includes when you are doing portrait photos. Try to change the angle you shoot a portrait and see just how a standard headshot can become so much more.

iPhotographer: Better Photos With The Rule Of Thirds

Posted by Chris Nitz on October 14th, 2010

You are now ready to elevate your iPhone photos to the next level. After all, the internet is full of quick snapshots, party pics, and other miscellaneous photos that do not do iPhone photography justice. How do you take this budding art and make it a richer photographic experience? Start by following the most fundamental of all photography laws: The Rule of Thirds.

What is the rule of thirds you ask? Without diving into the science of how the human eye works, this rule is about simply breaking your photos into thirds, and then using those thirds to your advantage. Utilize this rule in two ways for richer photos. First, pretend there is a TIC-TAC-TOE board on whatever you are going to photograph. Now, place your subject in any of the four intersecting points of this grid. If you have multiple subjects, fret not, try to place each subject in one to two of the intersecting points. The second part of this rule applies to breaking your photo into thirds. Let us say you are going to shoot a sunset over a lake nestled in a forest. Place the lake in the bottom third, the tree line should consume the middle third, and the sky the top third.

Maybe you can’t get the rule of thirds right away in your shot, have no worries, as you can apply the rule of thirds in a bit of post processing. Apps like Filterstorm and Photoshop Express will throw up a grid when you go to rotate your images. Use this grid to help visualize where images to fit into this rule, and if some cropping is going to be necessary. It may not be a perfect solution, but it will help you end up with better photos.

There are times you may break this simple rule, but when in doubt, stick to the rule. There is a reason this rule has stood the test of time, equipment, and improving technology. The next time you are just going to snap a photo with your iPhone, apply this rule, and watch as your photos become much more interesting.

Apps discussed in this post:

iPhotographer: Photo Posting For The Photog On The Go

Posted by Chris Nitz on October 7th, 2010

iOS has brought users a great all-in-one stop shop for taking photos, manipulating them, posting them online, and composing a whole blog post over that spectacular shot. In fact, because the iPad and iPhone have such great apps, there are some pros that don’t even carry a laptop with them onto photo shoots. Everything they need for quickly getting photos to the world can easily be handled right on these magical devices. Let’s look at just a few tools that make this possible.

Shooting The Photo
The first major change is just how the iPhone takes photos. Long gone are boring, under/over exposed, bland photos. Now we have HDR embedded right in the included camera app. If this is not powerful enough for you, apps like TrueHDR and Pro HDR can take your HDR photos to higher levels than what is already available.

Maybe you like adding a bit of flair to your photos -- this is where wonderful apps like Hipstamatic come into play. I use this app all the time when I am shooting fun setups with all my Lego People. The various lenses and films all add up for some fun, and unique shots that I have thought of recreating with my DSLR and Photoshop.

Processing Without Photoshop
The next part of any good shot is the post-processing step, and yes, just about any photo worth its weight in metallic paper is photoshopped in some form or another. This may be as simple as removing dust particles or increasing saturation levels, to full-blown photo manipulations in layers that a slice of Tiramisu would be jealous of.

Apps like Filterstorm, or Photoshop Express, allow for some basic photo-editing while away from your computer. Filterstorm even allows you to make adjustments in that all too familiar layer workflow so many of us are comfortable with. Are these apps going to allow you to completely avoid using Photoshop on a laptop? Of course not. However, what you do have is the ability to post process while sipping on a beer at the local pup without all the worry of dropping a pint on your precious laptop.

Uploading Those Shots
Uploading photos does have a few gotchas, as there is not one single great app to handle the huge number of uploading services. There are apps to handle some of the most popular sharing services like Facebook, Smugmug, Flickr, Twitter, and Picasa, however. Worst-case scenario is you have to email your photo to a client or a photo sharing service. This is undoubtedly one of the bigger downfalls of doing photography with the iOS devices, rather than a laptop.

Composing A Photo Blog Post
Once your photo is captured, processed, and uploaded, you just might want to quickly write up a small blog post about the photo. There are apps to allow you to do just that as well, but again, this will be limited to your choice of blog host. Some services may even support one iOS device over another device, as is the case with SquareSpace only supporting the iPhone at this time. There are applications like BlogPress and WordPress that can be used to update blogs, too. A tip here: if you can’t post from an app, type it up, email it to someone you trust, and have them add the blog posting. We all know that content is the key to keeping your viewers coming back.

iOS is not perfect, but it is getting better with every release. More companies are releasing apps that easily allow photo manipulation, sharing, and blogging for those who are constantly on the go. How has your iDevice changed your workflows while travelling? Are you one of those few who now leave your laptop at home in exchange for the lighter iOS devices?

Apps Discussed In This Post:

iPhotographer: iOS Changes Photo Scouting For The Better

Posted by Chris Nitz on September 30th, 2010

Scouting out your next photo is already more work than performing a root canal on a hyperactive child. Looking for vantage points, judging the sun, or moon, taking test shots, and so much more go into a good planning session. All this work often leads to lugging backbreaking equipment around just for a simple test shot. iOS has changed the face of test shooting and planning by margins that my back is very thankful for.

Notebooks be gone!
I have an over abundance of Moleskines full of notes, drawings, doodles, and ideas. These have traveled with me every place I run off to, including the local tea house. The introduction of the iPad has drastically changed my dependence on the tried and true Moleskine and pen. Now, apps like Penultimate allow me to draw out my ideas on my iPad. I can quickly sketch out ideas in a myriad of colors without the need of a big box of colored pencils. I can use Pages, iA Writer, or even Documents To Go to jot down all my notes, thoughts, and contemplations. My camera bag no longer rattles due to pens, pencils, or notebooks jostling around. iOS has taken several tools, digitized them, put them into an easy to use device, and made my life so much easier.

Let the camera stay in the car.
Now, every photographer knows you never travel without a camera. Heck, I lug my D90 just about everywhere I go. Yet, there are times it just does not work to my advantage to haul a camera, tripod, lens, notebooks, pens, and camera bag on a scouting trip. Sometimes I just want to hike in, snag a few quick shots, get to the coffee house, and collect my thoughts on the potential shoot ahead of me. The iPhone camera allows me to leave all the bulky equipment in the car while I take a few light test shots and start contemplating how I want to compose my photographic session.

I can then take these shots and upload them to my Flickr page via FlickStackr, or push them to my Facebook page for everyone to see. I can even do some editing on these photos thanks to Filterstorm. All these tools add up to leaving the heavy gear at home and using my iPhone and iPad for all my scouting missions. How do you use your iDevice for you planning missions?


iPhotographer: PhotoCaddy HD Review

By Chris Nitz on September 16th, 2010
Like having an expert crammed into your camera bag.
Read The Full Review »

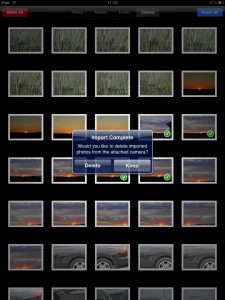
iPhotographer: Camera Connection Kit Review

By Chris Nitz on September 9th, 2010
Photos on the iPad just got even easier.
Read The Full Review »

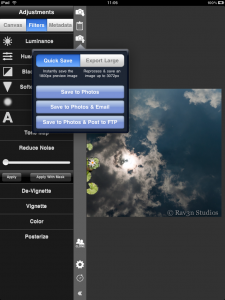
iPhotographer: Introductions, Filterstorm

Posted by Chris Nitz on September 2nd, 2010
+ Universal App - Designed for iPhone and iPad
Our rating: starstarstarstarblankstar :: EXTENSIVE :: Read Review »

We here at 148Apps would like to welcome you to the new iPhotographer column. What exactly is the point here? That is a mighty fine question.

We will bring you tips, tricks, and reviews geared directly at photographers of all skill levels. There will be tips and tricks on how to perform tasks on an iOS device that just might have you questioning the need for a laptop. We might even delve into some photo techniques and how these techniques can take your iPhone photography skills even further.

Now the question becomes one of credentials. I am an IT professional who ditched his education in computers for life behind a camera. I am a self-taught photographer who is looking to continue to grow my skill set while helping others along the way.

My name is Chris Nitz and I started my own photography business. I have read more articles on shutter speeds, rule of thirds, lighting, and white balance than I can ever care to remember. I have a passion to see the world from a viewfinder. I am by no means a photography elitist or so called expert. I'm here to learn right along with you, and encourage your comments and suggestions at the end of every article.

Let’s get to the meat of this column with a small review. This review is trimmed down, as you will see this app show up in future articles. The app I am referring to is Filterstorm

Filterstorm takes programs like Aperture or Lightroom and brings them right onto your iPad. Filterstorm contains all the goodness of tonal curves, noise reduction, saturation, and so much more right to your finger tips.

Filterstorm’s interface is easy on the eye while maintaining simplicity in navigation. Firing up the app will have the basic controls on the left side of the screen. Loading up a photo is as easy as choosing it from your photo library. Those with a camera connection kit can even bring in photos straight off a memory card.

Once the photo is in the app the real work begins. All edits are made without destroying the original photo. There is even an apply button you have to hit before the changes are made. You can easily test how the changes will look without racing for the undo option.

Filterstorm also gives you options for what to do with your photos once you’re done. FTP, Email, and saving directly to the iPad are all options. While this maybe a small list, it does continue to grow with each new update.

Filterstorm is not perfect, though. While the interface can be tucked away, it still takes up a decent portion of the screen. No Facebook, Flickr, Smugmug, or Picasa integration might have some people crying foul. There are also some funny quirks, like locking a photo into place when you are editing it. This creates a longer workflow process as the changes have to be made, applied, photo moved, and changes reproduced. Good thing there is a way to record the process and store it as a macro.

The light at the end of the tunnel is that the developer is very active with users on Twitter and various internet forums. This program has come a long way since version one and is looking to make bigger changes with upcoming releases.

Filterstorm is by no way shape or form going to take over from the likes of Lightroom on your desktop, but it will give you the perfect option for making quick edits while on the road. Programs that are far more expensive don’t offer this much flexibility. This is worth its weight in megabytes on your iPad. Those of you with an iPhone, this app is currently being migrated to iPhone 4 and 3GS. Look for it to hit the app store soon.

[gallery]