148 Apps on Facebook 148 Apps on Twitter

Tag: Settings »

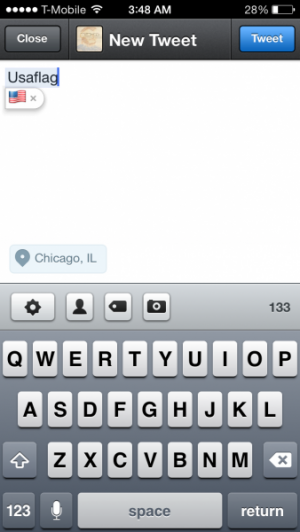
How To: Use Keyboard Text Shortcuts in Clever Ways

Posted by Carter Dotson on October 14th, 2013

Keyboard shortcuts on iOS are an extremely useful feature. However they may be extremely underused, perhaps because people just don’t know what they can do.

Read our guide on setting up and using text shortcuts (which is still valid with iOS 7) and then utilize these clever methods for keyboard shortcuts!

Canned responses to emails

Does your job have you responding to lots of emails saying the same basic thing? Create a shortcut with a good canned response to save some time and thought.

Fix common typos

iOS’ built-in autocorrect is useful, but sometimes its autocorrect can try to correct to phrases that aren’t what you want. So, make your common mistake the shortcut, and the corrected version your phrase. This will take preference over autocorrect’s suggestion so you can create your own autocorrections!

As well, autocorrect works for text shortcuts you've created. So if you make a typo for a shortcut, autocorrect will fix it to the correct shortcut and correct expanded text. You don’t have to be perfect – just close.

Only use the emoji you want

Like to use certain emoji but hate having the international keyboard button? Well, it’s possible to have only certain emojis be triggered by using a keyboard shortcut. Just enable the emoji keyboard, insert the emoji(s) in the phrase section, and then create a useful shortcut. Want to insert the US flag into tweets? Just create a usflag keyboard shortcut.

You can then disable the emoji keyboard and it will still work – it’s a system font, so it will work even if the keyboard is disabled. This works with any international keyboard, too, though emojis are more fun.

Insert frequently-used URLs

Constantly need to link to something? Set the URL as the phrase and set an easy-to-remember shortcut. This is perfect for reaction images or for, you know, more serious purposes. But mostly for GIFs.

What kind of shortcuts should I use?

Make sure that they’re phrases that don’t conflict with actual words. I like to make six-character shortcuts, usually making the first three relate to the topic of the shortcut, and the last three being something about the shortcut. It needs to be simple, memorable, and short enough to justify you saving time! Note that shortcuts do sync up between iCloud devices, so you don’t have to worry about having to recreate shortcuts when you pick up your other device.

Keyboard text shortcuts are a great way to save time – using them is a great way to make the use of your device more efficient! Go on and be short!

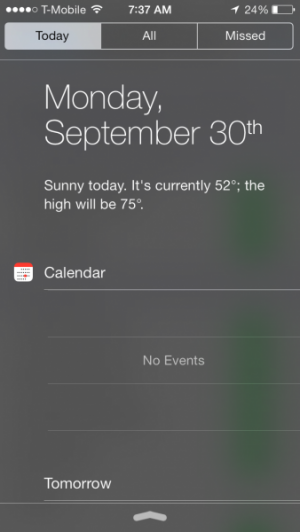
How To: Use Notification Center in iOS 7

Posted by Carter Dotson on September 30th, 2013

Notification Center may be nothing new to iOS users, but iOS 7 brings a bit of an overhaul to the veritable notification bar. Here's a guide to what's new, what's different, and what's been removed.

The first big change is that there are now three sections to Notification Center: TodayAll, and Missed.

Today replaces many of the widgets that were originally displayed at the top of Notification Center. This shows the current weather in a human-readable forecast, saying what the weather today will be, what the current temperature is, and what the high will be. Below this, Notification Center will tell you what events you have today and show you which events are coming up in the next few hours. Below this, the Stocks widget is displayed. At the bottom, the summary of events for the next day is displayed.

All is the traditional list of notifications: based on how they are sorted in Settings, apps' recent notifications will all display here as they come in. Tap the X next to an app's name in this view to clear out all of that app's notifications.

Missed shows notifications as well, but only ones that appeared while the device was locked. These are not sorted by app, but are sorted purely by when they came in. Clearing the app's notifications out of All or opening up the app the notifications came from will clear it out of Missed.

As well, Notification Center is now available from the lock screen, so you can see the Today, All, and Missed notification views from this screen. As well, you must swipe on the notification itself to open it up - the bottom Slide to unlock bar will always unlock the device, not view the most recent notification.

Many of the settings for Notification Center remain the same as they were in previous versions, particularly arranging notifications for the All view, but there's new settings for the new features. You can control Access on Lock Screen to enable or disable access to the Today view and to view notifications while the device is locked. Disable both to disable the Notification Center pulldown on the lock screen entirely.

The Today View settings control which widgets appear in Notification Center. Most notably, the ability to share to Twitter and Facebook from Notification Center has been removed.

This covers the changes to Notification Center in iOS 7. Now go on, be notified! Be aware!

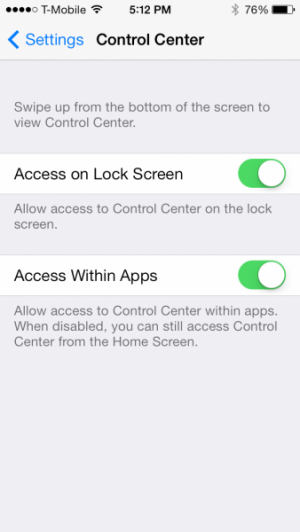
How To: Use and Configure iOS 7's Control Center

Posted by Carter Dotson on September 23rd, 2013

Perhaps the biggest addition to iOS 7 is the new Control Center, which makes common setting toggles available from anywhere with a simple gesture. Here's how to use it and to configure its options.

To call up Command Center, just swipe up from the bottom of the screen, like you would swipe from the top to open up Notification Center. This works from the lock screen as well.

Many of the controls that were available by double-tapping and swiping left-to-right in previous iOS versions are available here. The new multitasking bar has no actual controls.

The top row of commands from left to right toggles Airplane ModeWi-FiBluetooth, Do Not Disturb, and Orientation Lock. The first four can now be toggled from any app, instead of having to open up Setting to specifically toggle the features. Below that is the brightness dial. Auto-brightness toggling is sadly not yet available from Command Center, which would be a handy toggle for saving battery life, like disabling Bluetooth is.

Below the brightness toggle is the music and volume controls. These are expanded from the standard music controls in iOS 6 and earlier, in that there's more than just play/pause buttons. It's possible to see track name, artist, album, and current play time, with the ability to seek to a different time. Of course, reverse/pause/forward buttons are available, with the forward and reverse commands changing to jump 15 seconds commands when Podcasts is playing a track.

The AirDrop setting allows you to toggle whether AirDrop, the new feature for sharing content from apps with other local users, is disabled, enabled for contacts only, or enabled for everyone nearby. This will enable both wi-fi and Bluetooth if they are disabled. The text will be black when disabled, and will turn white when enabled, and will display which setting is enabled when there's not an AirPlay receiver nearby. This is the other option on this row, and it allows for audio, video, and/or mirroring playback to AirPlay receivers on the same network.

The bottom row has quick shortcuts to four built-in features. On the left: Flashlight, meaning that it's time to dump that flashlight app for good. Second from left is a shortcut to the Timer in the Clock app. This means setting an alarm is just an additional tap away. Second from right is Calculator, and on the right is Camera. This makes these features easier than ever to activate.

Settings has a Control Center section, but there's only two toggles: Access on Lock Screen and Access Within Apps. The former configures whether Control Center can be accessed from the lock screen, and the latter whether it can be accessed within apps. For some intense games, this may be a good setting to have, but much like Notification Center a quick inadvertent swipe will not open it up, it will just call up an arrow to swipe to open it up, so it shouldn't open unless by the user's volition. Still, that's why this setting exists!

Control Center makes using an iOS device more convenient as many toggles are now available without switching apps. Settings just might feel lonely without all that attention now!

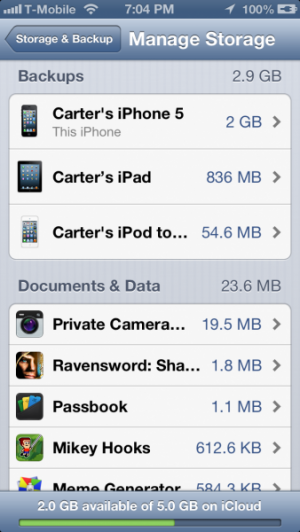
How To: Manage iCloud Settings

Posted by Carter Dotson on August 12th, 2013

iCloud, much like life, is a scary and often unknowable thing that doesn’t always work the way it should. But much like life, if you know the little things and tweaks, you can make it work much better for you. I think that’s how life works, anyway. At least that’s how iCloud’s settings works. Here’s a guide to the iCloud settings menu.

The iCloud settings are available in the Settings app, under the iCloud section when you scroll down. Here, you’ll see a bunch of different toggles and sections to browse.

Account allows you to control which account is currently logged in to iCloud across the device. As well, you can change the description of the account, modify your storage plan and payment information, and set up advanced email options.

The various switches for Mail, Contacts, Calendars, Reminders, Safari, Notes, and Passbook will toggle those features on or off for the iCloud account that’s currently logged in, for those who don’t want that info to sync. For certain features, a prompt will appear to have the current local data deleted or not.

The Photo Stream option will allow for uploading to Photo Streams and for Shared Photo Streams to be toggled as well.

Documents & Data will allow you to disable apps uploading data to iCloud, such as games that save to iCloud. You can also toggle Use Cellular Data to help save data fees when on the go. Find My iPhone’s toggle allows you to enable or disable finding your iOS device with the Find My iPhone service. Storage & Backup allows you to view how much storage you have left in your account. Change Storage Plan lets you pay for more storage. The iCloud Backup toggle allows you to enable or disable backing up to iCloud when plugged in. You can also force the backup by tapping Back Up Now.

The Manage Storage section lets you see which devices are being backed up to iCloud, and control what specifically gets backed up to iCloud and to delete the backup entirely. If you select the backup on the device you’re currently on, then toggles for each app’s backup will be shown, allowing you to disable backing up that app to iCloud. You can disabled syncing of Camera Roll photos and videos to iCloud to save storage space, for example. Or if an app uses a lot of local storage that you don’t necessarily need synced up, you can disable it. Scrolling to the bottom and tapping Delete Backup will allow you to delete that backup form iCloud, but you can’t restore from it in the future.

The Documents & Data section lets you see which apps are storing how much data in iCloud. Apps that just use key value data won’t be shown, but games that use save files to sync up between devices will be shown here, too. You can also delete any files as necessary.

Now you know how to properly use the iCloud settings menu, and knowing is half the battle.

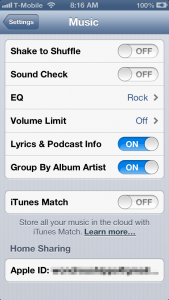
How To: Manage and Master iOS' Volume Settings

Posted by Carter Dotson on July 15th, 2013

iOS' devices volume settings are anything but straightforward, what with the different volume levels, switches, and inconsistent rules of what plays sound and what doesn't when it should be silent. Hopefully this guide will make controlling the volume more clear, so as to understand why some things are loud, and some things are not!

There’s two different volume settings to be aware of: the ringer volume and the sound volume. The ringer volume controls phone ringtones and notification sounds. The sound volume controls the output of sound from games, videos, and music.

Now, it’s possible to control the ringer volume either manually or to have it set to a specific volume. The latter might be handy for those who don’t want to accidentally make their ringer quiet, or just like to have one set volume. Go to Settings->Sounds. Set Change with Buttons to off. Drag the volume slider to your desired setting. Disable Change with Buttons to make the volume buttons always control the sound volume.

Now, music and especially videos run into a fairly annoying problem: they don’t respect the iPhone’s mute switch for playing sounds. Sitting in a meeting, and suddenly that baseball game’s sound starts playing? Awkward! The prevailing thought on Apple’s side seems to be that by playing one of these despite having the silent switch on, that the user wants sound to play. For music, sure, makes sense. For videos, especially live streaming of sports? Nope. Be careful: ensure that the sound volume is muted as well as the ringer volume before starting.

If you want to ensure that you are lowering the sound volume and not just the ringer volume if you have the volume buttons set to control both, double-tap the home button and swipe to the left until you see the volume control. This takes two swipes on iPhone and iPod touch, one on iPad.

This all gets especially confusing considering that the iPod touch and iPad have a virtual mute switch that is all-encompassing, meaning it will quiet music and videos as well. This is available from the multitasking bar as well by double-tapping and swiping left. This is not available on the iPhone, and it will not display on the iPad if your side switch is set to mute. You can configure what the side switch does in Settings -> General.

Finally, the Music section of Settings has some additional olptions for the built-in music app and volume. Sound Check will attempt to level the volume of all songs. Volume Limit will set a maximum volume for listening to music so as to ensure that you don’t blow your ears out with your headphones!

This should hopefully demystify what the different sound settings do. Turn it up to 11! Or don’t.

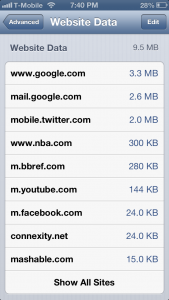
How To: Manage Privacy Settings on iOS

Posted by Carter Dotson on January 21st, 2013

Our phones have become a significant part of our lives, holding large quantities of our personal data on them. Apps that use our data are also a significant part of them, especially given the rise of free apps and services – if you’re not paying, you’re the product – and what these apps have access to is often quite extensive. While Apple’s walled garden does keep many of those with malicious intent away from the App Store, they’re not perfect. There may just be an app that you trust that is doing something with the data you gave it permission for. Here’s how to manage these privacy settings.

The first and most obvious destination is the Privacy section in Settings. Here, you will see sections for various types of data that apps have requested.

By going to one of these sections, and switching the toggle for that app off, then it will not have access to that data any more. So an app that requests Photos access can have it be restricted. Or, if you initially denied access and wish to grant it, you can now do so from this section.

The Location Services section is particularly worth delving into because not only can the icon appear at random times for no apparent reason, but the section to manage it has many wrinkles that the others do not. One, there are variably-colored location icons next to each service, and they may not be apparent to what they mean until you scroll to the bottom, where iOS explains what each icon means.

What this means is that you can see on this section which apps are currently requesting your location, not just which apps have access to your location. If an app is continually causing the location services icon to appear in the status bar (and potentially draining your battery), you can see which apps are the culprit here. Often times, apps that use location services can have settings disabled from within the app to have their recurring location check disappear, as having loaction access enabled periodically may be key to your usage of the app. As well, the System Services section shows several system functions that use your location, including one for Location-Based iAds that can modify the types of ads you see.

Hopefully these tips have helped you manage your privacy better, and you have a greater understanding of the types of access that iOS apps and system functions have to your data.

Now, there’s one particular advertising-related privacy setting that’s not in Privacy that’s worth considering. Go to SettingsGeneralAbout and scroll all the way down to Advertising. Tap on this, and you’ll see a setting for Limit Ad Tracking. By enabling this, then services that identify your device by the Apple Advertising Identifier cannot track you based on this. This means that advertisements will be less targeted to you.

How To: Configure Safari's AutoFill, Private Browsing, and More

Posted by Carter Dotson on January 14th, 2013

Safari is an app that’s been around for a long, long time, having been on iPhones since the original one! It’s easy then to get into a rut where you use it and don’t consider what else it can do. Well, let’s go through Safari’s section in Settings to poke through some of the options that can tweak your Safari experience to be much better.

Search Engine allows you to set Bing or Yahoo as your search engine. Sorry, AltaVista fans and Pawnee residents.

AutoFill makes it easy to enter passwords and personal info in website forms. Enable Use Contact Info with your contact card, set as the iOS default but something that can be changed from here, to have names and addresses in forms filled automatically with your data. Names & Passwords will fill in usernames, passwords, and other info from your contacts in forms as appropriate. Tapping Clear All will reset this data.

Private Browsing changes a Safari session to not store any history or browsing data once completed. Open tabs can be saved or closed when switching back and forth. If anyone gets suspicious as to why you’re using private browsing, just tell them it’s for the sleek dark interfaced that indicates you’re in private mode.

Clear History will clear your list of previously-visited sites. Clear Cookies and Data will delete any tracking cookies stored on your device, and also clear out any logins. Reading List’s Use Cellular Data toggle will allow for you to save on data usage by only letting Reading List sync over wi-fi. Fraud Warning will warn when you’re on a suspicious website. JavaScript allows you to disable this for any sites that may be slowed down by this. Block Pop-ups allows you to let pop-ups open as new tabs.

Finally in Advanced, the Website Data section allows you to clear up some storage space by deleting saved data from websites. Web Inspector is a feature for developers who are working to optimize their sites for Safari on iOS.

 Hopefully this guide has shown you some useful features for Safari that you never even knew existed or had no idea how to use!

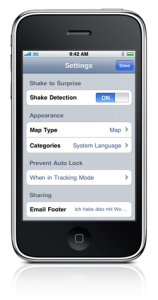
Edovia and FutureTap Announce Open Source Project InAppSettingsKit

Posted by Arron Hirst on January 12th, 2010

I get a lot of e-mails daily, most of them the usual snore-worthy PR mailshots from the App Store big boys .. and of course (well, at least most of the time), these are about upcoming games and apps for the iPhone itself. So, it was refreshing this morning to receive the heads up on a new completely open-source project from iPhone development studios Edovia and FutureTap.

Originally a Canadian-German co-production between both firms, InAppSettingsKit is an open-source project which allows iPhone developers to place settings in-app, as opposed to hiding them away in the iPhone OS Settings.app.

Edovia and FutureTap admit there has been extensive discussion among the iPhone community about which option is better. Do you oust your app's settings to Settings.app and hope the user finds them successfully, or do you opt for the in-app route and risk cluttering your once streamline app with a bunch of settings most would only use on the rare occasion? According to Edovia and FutureTap, there are quite a few reasons in-app settings should be considered.


- Settings.app becomes a total mess with longer load times
- If only in Settings.app most users simply don’t understand the mechanism and miss the settings
- A context switch is needed to switch between settings and the app. If on the 16th screen, this involves quite some tapping and flicking.
- In-App settings can instantly change the behavior of the app

Sure, in-app settings are popular. After all, What's better than to be able to edit the global settings of an app, without having to leave the actual app? We've seen a slurry of the big name apps take this approach. Including the likes of Twitterrific, AIM and more recently, Tweetie 2 .. among others.

What's interesting about this project is, as a developer, instead of having to choose one route and ultimately having to accept the consequences via user feedback, it proposes a new outlook on settings for iPhone OS. Dubbed 'Hybrid Settings' the settings are place in Settings.app sure, but they're also available in-app too, providing the best of both worlds - and don't worry about visual consistency of your settings either, using the kit your in-app settings will look just like as if they were pulled straight from Settings.app.

"We’re proposing a second approach that we call “hybrid settings”. In this model, the user has the choice: the settings are available in Settings.app. But they’re placed in-app as well. That way, every user can decide where to edit the settings. The in-app settings are a 100% clone of the Settings.app style."

Developers can find out more about the project at InAppSettingsKit.com - and if you have an app and you've recently added the InAppSettingsKit to it, the guys at Edovia and FutureTap want to know. Add yourself to the list at: inappsettingskit.com/apps.