148 Apps on Facebook 148 Apps on Twitter

Tag: Howto »

How To: Enable and Manage Google's 2-Step Verification System For Better Security

Posted by Carter Dotson on July 29th, 2013

Many people use Google accounts to get their email, contacts, and calendars on iOS. If these accounts were compromised, it’d be a bad situation. However, there’s one way to ensure account safety: by setting up two-factor authentication. Google supports it for accounts, and iOS can use it, but there are some special things to know for iOS users.

To set it up, go to your account dashboard and configure the Manage security section. Click Edit next to 2-step verification and then click to start the process. Put in your phone number. Google will send a text to this number with a 6-digit verification code. Enter it in. Then choose whether the computer you’re setting up 2-step verification from is trusted. Finally, confirm that you want to enable it, and voila! 2-step verification is now enabled.

Keep the page that it goes to open, there are a couple of settings worth configuring here. This page can be reaccessed from the 2-step verification section under “manage security” in the account dashboard. Yes, it’s a bit buried.

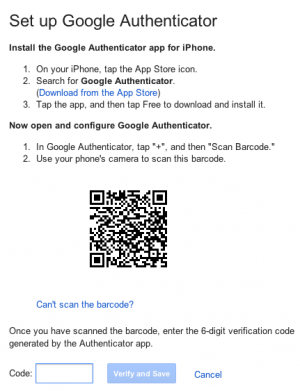
While codes by default will come in via SMS, if you install the Google Authenticator you can get codes over wi-fi to a trusted device.

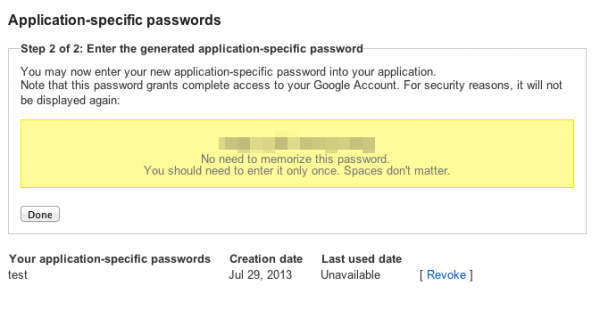
Now, for things like the iOS settings for mail, contacts, and calendars, a special app-specific password will need to be generated, because these do not have the ability to redirect to a web page for the second step of the verification process. From the 2-step verification settings, click on the link to Manage application-specific passwords. Now here, it will be possible to name an application or device with a password that will bypass the second step of authentication. These passwords can be revoked at any time, but will also only be displayed by Google once. Generate a password and enter it in to your account’s settings on iOS immediately.

By enabling 2-step verification on your Google account, you have now helped to make it more secure by adding that trusted device and that extra step to get in. It’s a bit more inconvenient, but given all the important data on your Google account, isn’t it worth it?

How To: Use and Manage iMessage, Including How to Remove an Old Phone Number

Posted by Carter Dotson on July 23rd, 2013

Apple's iMessage is great. Sending messages without using up text plan messages or over wifi? Brilliant! Plus, typing out messages on the iPad or from a Mac is so much better. But there's plenty of little settings that can modify your experience, or make it difficult if you ever switch phones. Here's our guide to helping clear up how to use iMessage.

From your device, to enable or disable iMessage, go to Settings -> Messages. The very first switch will allow you to disable iMessage if you'd rather not deal with it altogether.

Send Read Receipts will send a mark that a message was read to your conversation partners after you read a new message. Don't want others to know? Turn this off.

Send as SMS will allow you to send messages as standard messages over cellular if data is not available. This way you can seamlessly transition between iMessage and SMS without a beat. If a message fails to send over iMessage, tap and hold on it in the Messages app. That will pull up an option to resend it as a Text Message.

Now, it's possible to send and receive iMessages from not just your phone number but your email address as well. To add a new email address, go to the Send & Receive section. Tap Add Another Email... and then type in the email address you want to add. Open the email in your account to confirm the email. A notification will be sent when it is added.

If you want to customize which address your iMessages are sent from, choose the phone number or email address from the Start new conversations from: section. Now, when you send a new message, your message will be identified as the email or phone number that you've chosen. If you've just switched phone numbers, this can prevent confusion.

If you have an iPad, you can set your messages to be sent from your phone number once it is added from an iPad.

Now, let's say that you switch over to an Android, and you want to make sure that when iPhone users send you a message, it is sent as a text message and not as an iMessage that you wouldn't get on your phone. The easiest way to handle this is to go to Apple's My Support Profile page and delete your old device. Open your device's page and Unregister the device. You can also reset the password of your Apple ID account from the web which should cause iMessage to log out on your old device, not allowing it to be used for your old phone number any more.

Of course, you'd never leave the iPhone, would you? Right? Don't tell anyone, but I won't judge you.

How To: Manage and Master iOS' Volume Settings

Posted by Carter Dotson on July 15th, 2013

iOS' devices volume settings are anything but straightforward, what with the different volume levels, switches, and inconsistent rules of what plays sound and what doesn't when it should be silent. Hopefully this guide will make controlling the volume more clear, so as to understand why some things are loud, and some things are not!

There’s two different volume settings to be aware of: the ringer volume and the sound volume. The ringer volume controls phone ringtones and notification sounds. The sound volume controls the output of sound from games, videos, and music.

Now, it’s possible to control the ringer volume either manually or to have it set to a specific volume. The latter might be handy for those who don’t want to accidentally make their ringer quiet, or just like to have one set volume. Go to Settings->Sounds. Set Change with Buttons to off. Drag the volume slider to your desired setting. Disable Change with Buttons to make the volume buttons always control the sound volume.

Now, music and especially videos run into a fairly annoying problem: they don’t respect the iPhone’s mute switch for playing sounds. Sitting in a meeting, and suddenly that baseball game’s sound starts playing? Awkward! The prevailing thought on Apple’s side seems to be that by playing one of these despite having the silent switch on, that the user wants sound to play. For music, sure, makes sense. For videos, especially live streaming of sports? Nope. Be careful: ensure that the sound volume is muted as well as the ringer volume before starting.

If you want to ensure that you are lowering the sound volume and not just the ringer volume if you have the volume buttons set to control both, double-tap the home button and swipe to the left until you see the volume control. This takes two swipes on iPhone and iPod touch, one on iPad.

This all gets especially confusing considering that the iPod touch and iPad have a virtual mute switch that is all-encompassing, meaning it will quiet music and videos as well. This is available from the multitasking bar as well by double-tapping and swiping left. This is not available on the iPhone, and it will not display on the iPad if your side switch is set to mute. You can configure what the side switch does in Settings -> General.

Finally, the Music section of Settings has some additional olptions for the built-in music app and volume. Sound Check will attempt to level the volume of all songs. Volume Limit will set a maximum volume for listening to music so as to ensure that you don’t blow your ears out with your headphones!

This should hopefully demystify what the different sound settings do. Turn it up to 11! Or don’t.

How To: Edit Photos Directly from iOS' Photos App

Posted by Carter Dotson on July 8th, 2013

Why use a separate app to edit your photos? The built-in Photos app offers a variety of basic features for sharing and editing photos that may just handle most usage cases without needing to launch a separate app to make rudimentary changes to photos. This is how to use the Photos app!

Launch the app and choose one of the photos that you want to view and/or edit. You are first presented with the Share arrow for posting to various social networks, sending it to people, or other options. The Play arrow will start playing a slideshow of photos in the album the current photo is in. The AirPlay icon will send the photo to an Apple TV on the network. The trash can icon will delete the photo. Don’t expect this to look the same in iOS 7, what with the death of skeumorphism and all.

The real fun starts with the Edit button in the upper right corner. The rotate button will change the orientation of the photo, which is handy if photos have come out sideways. It rotates photos in a counter-clockwise 90-degree turn with each press.

The wand icon will turn on auto-enhance, which adjusts light and color levels in the photo automatically to try and make it look better. Tap the icon again to toggle it, and tap Save in the upper-right corner to save the change. The red circle with a line through it is the red-eye removal tool. Tap on a photo with red-eye and it will be removed if the app detects red-eye. Finally, the crop icon will allow for photos to be cropped. This is grat for making precise changes when wnating to share a photo to Instagram, or creating a new Twitter avatar. Use the Constrain option to force the cropping section to a certain ratio.

The forthcoming iOS 7 update will add new features like filters to the existing set along with a new design, so be prepared to do even more with photos, from Photos!

How To: Set Up an AirPort Base Station From Your iPhone, iPod touch, or iPad

Posted by Carter Dotson on July 1st, 2013

Apple’s AirPort routers are easy to set up and come with great compatibility with Apple devices. However easy to set up they are, it’s still important to know what you’re doing. Here’s a how-to guide on setting up an AirPort from your iOS device.

When you plug in your AirPort, go to Settings -> Wi-Fi, and choose to Set up an AirPort Base Station. Name the network and give it a password, and you’ll have it set up for basic usage.

But to configure settings on it, you’ll need the AirPort Utility app. Versions are available for Windows and Mac, but the iOS version makes it incredibly easy to configure from your iOS device.

Launching the app will show all nearby AirPort devices, with images representing which model they are. Tap on yours.

From here, you can view the connection that your device has to the internet, its IP address, the firmware version, the name and basic information about the wireless network, the MAC addresses of connected clients, and other hardware info.

To edit the router’s settings, tap Edit in the upper-right corner. This will take you to the screen where you can edit various setting sfor your device. Depending on which AirPort you use, your settings listed here may vary.

The Base Station option lets you configure the name of your AirPort, and to change the hardware password to it. This is different from the wireless network password.

Network allows you to choose the Wi-Fi mode, whether you’d like to create a wireless network, join another device’s wi-fi network (which can be used to share internet from another router, or to use your AirPort as a wireless ethernet bridge), extend a wireless network (to extend the range of another AirPort device), or to turn wi-fi off entirely if you just want to use Ethernet. The Guest Network setting will create a private network that will be separate from your main network that has its own security settings.

The AirPlay setting for devices with an audio output allows you to configure what the audio output is used for. This is where the joining another wi-fi network setting comes in handy: an AirPort Express can be used as an AirPlay audio receiver with an output to powered speakers. AirPlay can also be disabled if you don’t use the audio output. This setting will not affect AirPlay transmission over the entire network, just for audio output from a compatible device.

Internet Connection lets you configure how your AirPort connects to the internet. You can set up a static IP address or a PPPoE connection if necessary, and add in your own custom DNS server options, which may be faster than the ones your ISP provides. Consider using an alternate set of DNS servers.

The Advanced section contains some of the router settings that may be best tackled by advanced users who know what they are doing. However, there are a few buttons of note here. The Add WPS Printer button will let you add a Wi-Fi printer to your network. The Restart Base Station button will restart your AirPort if issues arise. The Restore Defaults will let you reset your device to factory defaults.

Note that other AirPort models may have different settings for their different features. Hopefully with these tips, you’ll now have a hold on how to set up your AirPort and be routing like a champ.

How To: Use Find My iPhone to Locate Your iOS Devices

Posted by Carter Dotson on June 24th, 2013

Do you cower in fear that you'll lose your iOS devices and never be able to find them? Well, Apple provides handy tools to make sure that you can at least have a lead on tracking them down and a way to protect the personal data contained within. It's called Find My iPhone, but for it to be any good for you, it's gotta be set up properly! That's why this guide is here.

To set it up, start by enabling Find My iPhone in Settings. It may be automatically enabled from when you first set up your device with iCloud, but if not, or if you disabled it previously, it can be re-enabled. Go to Settings, scroll down to iCloud, and then scroll down to Find My iPhone. Set this toggle to On.

Next, download Find My iPhone from the App Store. Yes, it's a misnomer for iPod touch and iPad users but it will find your devices as well.

When you launch the app, you will be asked to log in with your Apple ID. If you have multiple Apple IDs, choose a common one to log in with on your other iOS devices.

After you do this, it will show any other devices that you have logged in with Find My iPhone, allowing you to see where they are, and to help find them.

Tapping on an individual device will open up a map view showing its current location. The battery life will be shown in the upper-right corner so you'll know if it's near shut-off or not if you are looking for it. Tapping on the device on screen will toggle to map mode where you can scroll around its location, and get directions to its location by tapping on the car icon on its location. By tapping the blue arrow next to its name, three options will be presented to you.

You can Play Sound, which will cause the device to play a unique sound that will help you find it by sound, which will keep playing until the device is found. This is handy if you ever misplace it where you live! The Lost Mode will allow you to protect your device by putting a temporary passcode on it so that no one can use it, even if there's no security on it previously. You can also put a contact number and a message for the person who finds it. All of these options will send emails to the contact email on record for the account so you'll know when someone is trying to use Find My iPhone features.

If you fear that your device is unrecoverable, the Erase Device option will erase all contents on the device. This is an option of last resort to protect your personal data. Hope you backed it up recently!

You don't need an iOS device to find your iOS devices - these features are all available from iCloud.com as well. Fun note--iCloud.com still uses Google Maps, not Apple Maps!

Following this guide should help you keep track of your device if you ever lose your devices, be they in another room or in another city!

How To: Listen to Lossless Music

Posted by Carter Dotson on June 17th, 2013

Most digital music nowadays sounds slightly worse than it does on CD, thanks to audio compression. This is great for quickly downloading music, but not best for audio quality. If you want to listen to music on your iOS device without that pesky compression, and are willing to give up some additional storage space to do so, we have just the guide to do so.

The easiest way to listen to lossless audio on your iOS device is to use the Apple Lossless Audio Codec. ALAC files can be played by the built-in Music app, providing the best support, and the format can be handled by iTunes.

Now, FLAC exists as another alternative. It’s the most popular lossless music distribution format on the internet largely thanks to its open source nature, though ALAC is now open source as well. Bandcamp artists frequently offer music in FLAC format, though ALAC is also an option.

Converters exist for going from FLAC to ALAC - as both codecs are lossless, there’s no degradation in quality in converting, but for using FLAC, a third-party app with iTunes file transfer must be used. The only real difference between the two is at a technical level. I’ll let the audiophile super-nerds fight this one out, but for iOS users’ convenience, ALAC is the better choice here.

Now, you’re going to want to start with your music in a lossless format. This means ripping from a CD, or finding FLAC/ALAC files. Converting from a compressed format to lossless is just pointless.

If you already have ALAC files, then just drop them in iTunes, and put them on your device. ALAC is natively supported.

If you have a CD (they still make those) that you want to make into ALAC files, just load the CD onto your computer and open it up in iTunes. Go to Preferences, and Import Settings on that first page. Set the Import Using dropdown to Apple Lossless Encoder. Now import the CD. It will be added to your library, which you can then add to your iOS device the same way that any other lossless audio file can be added.

If you have FLAC files that you want converted to ALAC, there are plenty of conversion software titles out there. Consider XLD for Mac, which has a drag-and-drop interface, and the cross-platform fre:ac.

If you just want to play the FLAC files on your device directly (such as if you have a large collection you don’t want to convert), then there are plenty of apps that will play FLAC files. Some free options: FLAC Player+, TuneShell, and MoliPlayer.

You should now be on your way to enjoying your music exactly how the creators intended it to be heard!

How To: Free Up Space by Deleting Apps' Cache Files

Posted by Carter Dotson on June 10th, 2013

Ever notice that you’re running out of free space, and apps like Instagram, Spotify, and Vine are taking up a lot more space than they should be? Some apps like these take up over 500 MB of space for cached data, which can be a killer given the limited amount of storage space on most devices. As well, they don't engage in a best practice of making it possible in the app itself to delete cached space. When trying to install a large app, this can be a real problem.

It's time to take the power back, and your device's free space. I’m going to show you two ways to clear up this cached space: the brute force way, and the way that’s a bit more clever.

Method number one: Just delete and reinstall the app

This will delete all the data for the app. It’s easy enough. The downside? You have to redownload and reinstall the app, not to mention needing to login again. Any special preferences will be gone too. This is a solution. It's just not a very good one.

Method number two: delete the cache files using i-FunBox

The cache files stored by apps can be accessed by users with a little bit of savvy. Download an app like i-FunBox to access your device. Plug it in to your computer. Launch i-FunBox. Go to the “Applications” section of your device, and find the app whose cache data you want to delete.

Find the folder called Caches in the Library folder. Right-click on it and delete it.

This should work for most apps. See the results in the Usage section of Settings -> General:

See, with Spotify, deleting the Caches folder cleared up much of my recent cache usage, with the tracks that I saved for offline listening still in the app. You will notice that after using the app again, the Caches folder will be recreated, so this is non-destructive.

Some apps may use multiple or non-standard folders. The best way to discover where this cached data is hiding is to select all the files, copy them to your computer, and then poke through folders’ file sizes to see where large chunks of data are hiding. Then you can delete those folders safely.

In general, just deleting cached data is safe, because by definition it’s just temporary. As long as you don’t delete anything in the Preferences folder, you shouldn’t lose anything important. Feel free to back it up to be safe.

Not that you may need to do this whenever you need to free up some space as the cached data will add back up as you use the apps. Still, if you’re trying to install a large app, this can free up space without needing to delete apps themselves. So go ahead, install Infinity Blade II and keep it there!

How To: Transfer Files to and From Your iOS Device

Posted by Carter Dotson on May 28th, 2013

An iOS device, just by itself, is capable of many things but file handling is not one of them. Thankfully, there are ways to get files from one’s computer to an iPad, iPhone, or iPod touch with or without a cable. Here are two of the best ways to transfer files to and from your iOS device.

Dropbox

The great thing about Dropbox is that it syncs up very easily with multiple devices. Apps are available for every major platform, but the most convenient thing is that it’s possible to set it up on a computer where Dropbox folders work just like local storage. This way, files can be saved to Dropbox folders and made available easily wherever Dropbox access is available. There’s also access for uploading and downloading files through the web browser for those who just need quick access or can’t install the app for computers.

Don’t worry, files in Dropbox aren’t just stuck in Dropbox’s app. It’s possible to open files in compatible apps. Just tap the arrow in the upper-right corner, tap Open In… and choose the appropriate app. This way, PDFs can be signed in DocuSign Ink, or text files opened in Byword, for example.

Those who prefer a Google bent to their cloud storage might want to check out Google Drive - it provides much of the same functionality.

GoodReaderfor iPad and iPhone

The beauty of GoodReader is that when it comes to storing and handling local files, no app beats it. Most any file can be opened up in it at least for storage, if not viewing and using in some fashion. Of course, if the app just existed by itself, it’d be useless. Thankfully, getting files to and from GoodReader is a breeze. You can link up a cloud storage service like Dropbox, add in an FTP server, or even SMB/AFP servers for getting files to and from computers with shared folders.

As well, tap the wifi icon in the app to enable wifi transfer mode, where connecting to the given URL through a web browser will allow you to download and upload files. As well, the app supports transferring files through iTunes’ file sharing.

Sadly, just using one’s iOS device as a USB storage device is difficult without the use of outside programs like i-FunBox installed on every computer, which of course kind of beats the point of having a USB storage device. It may be possible through jailbreak utilities, but jailbreaking is more trouble than it’s worth. Have any other useful ways for transferring files? Let us know in the comments.

How To: Enable a Passcode to Protect Your Device's Contents

Posted by Carter Dotson on May 20th, 2013

Think about all the important information and communication methods that you have available on your phone. Now think that it's probably all unprotected if someone nabs your phone. Thankfully, it's possible to set a passcode lock in order to help protect your device. Here's how to do it and to keep it from being too much of a hassle to use your phone when you want to!

Go to Settings -> General -> Passcode Lock. Tap Turn Passcode On. You will then be presented with a keypad to input a 4-digit passcode. You will be prompted to enter it twice in order to verify that you have it correct.

If you want something a bit more complex, turn off the Simple Passcode option and you will have the ability to input a complex passcode using the iPhone keyboard. Only the default language one will be used, preventing a security hole where you could disable a necessary keyboard to unlock your phone!

There's two advantages to protecting your phone. There's the obvious one of not just allowing anyone access in to your phone if someone grabs hold of it. This also has the advantage of encrypting all the data on your phone, so if some nefarious person gets access to your device, it'll be difficult to extract the data off of it.

You can also enable the Erase Data function, where ten wrong passcode entries will erase your phone. Make sure that you back your phone up regularly! As well, if you have Find My iPhone set up, you can make it so that you can reset your device remotely.

The obvious downside to protecting your phone is of course that it's just a bit more inconvenient to unlock your phone when you pick it up, so it's a tradeoff. But considering the amount of sensitive data that's on your phone, it might just be worth it to do it. However, there are options for combining security and convenience. You can set the passcode lock to only enable after a certain amount of time, so that if you're frequently using your phone, you won't be inconvenienced. As well, you can leave message replying, Passbook tickets appearing on the lockscreen, and Siri access, without requiring the device to be unlocked.

If you decide that you want to not input a password any more, just tap Turn Passcode Off in the Passcode Lock settings. This will not encrypt your data any more, however.

While it can be a slightly-annoying additional hassle, setting a passcodelock is a great option to protect your device. How do you feel about using it? Let us know in the comments!

How To: Use Siri and Voice Typing

Posted by Carter Dotson on May 13th, 2013

Recent versions of iOS have made your voice a much bigger part of the iPhone, iPad, and iPod touch usage experience. Now, it's possible to use your voice to do many commands with Siri, and to type things out with your voice. Here's how to use iOS' voice actions, available on iPhone 4S & 5, iPad 3, 4, & Mini, and iPod touch 5th generation.

Siri is very easy to use. Call up Siri by holding down either the home button or the play/pause button on your headset remote. Siri can respond to a variety of commands, most of which can be seen by tapping the (i) after the "What can I help you with?" text. This shows all the commands that you can speak to Siri, including actions as diverse as sending tweets and getting sports scores.

Siri's options can be configured by going to Settings->General->Siri. Here, it's possible to change the language, the default info that Siri will work with, and to enable Raise to Speak.

The other big feature is the ability to type with your voice. Just tap the microphone button next to the space bar, and say what you need to say. Enunciate clearly for the voice recognition to be more accurate. If a word may have multiple possible interpretations, a blue squiggly line will appear underneath the text. Tap the word to get alternate suggestions.

Now, saying the name of a punctuation mark will generally add that in to the sentence you're speaking. This is especially annoying if you want to talk about how awesome the Jurassic period was. In many cases, using the word "period" in a sentence will default to the punctuation, but if you see that blue squiggly line underneath the preceding word and the punctuation, then you can tap that and a new suggestion that includes the actual word "period" should be suggested. Sometimes the voice recognition will intelligently actually put down the word "period" but it varies on a case-by-case basis.

Finally, do you want to use large capital letters to get people's attention, but just don't have the heart to convey your anger through your fingers? Just enable caps lock by double-tapping the Shift key before enabling voice typing.

Hopefully these tips have helped you use the speech-to-text functionality of iOS.

How To: Use Calendar Reminders and Recurring Events to Never Forget an Important Date Ever Again

Posted by Carter Dotson on May 6th, 2013

Recently, I saw someone tweet that they had forgotten their anniversary. Now, with some people, I could understand this, but this person, who shall remain nameless so as to not immortalize their indiscretion, is very tech-savvy. Really, there should be no excuse! But sometimes you just don't know how to use technology to your benefit in certain ways. So as a public service for everyone who needs to remember an anniversary, or anything recurring, like a reminder to pay one's bills monthly, here's how to set up recurring events.

Boot up Calendar. Go to the date that you want to set up the recurring notification for. Tap the + icon in the upper-right corner to add a new date. Set up the event as normal.

Now, check the Repeat setting. You can set up an event to repeat daily, weekly, bi-weekly, monthly, or yearly.

The End Repeat section will allow you to choose when this reminder ends, like when a bill is due to be paid off. Save the event, and now every month, an event with the same parameters will appear, including the same reminder settings.

If you want an additional level of notification, sync up your reminder with a Google Calendar account. Then go to your Google Calendar, go to one of the event's dates (preferably the most recent future occurrence) and you can add email reminders. As well, you can configure alert times to come in at different or additional intervals.

Now, let's say that you want to cancel this event's future recurring dates. Like if your beloved turns out to be an alien reptile or something, and that's just a dealbreaker that you don't want to be reminded of. Just go to the event on your calendar, and tap Edit in the upper right corner. Now scroll to the bottom and tap Delete Event. Next, a prompt will come up asking if you want to Delete This Event Only or if you want to Delete All Future Events. This same prompt will appear if you make any changes to a recurring event.

With these tips, the only excuse you have for messing up an important date is yourself! Pressure's on!

How To: De-Clutter Notification Center

Posted by Carter Dotson on April 29th, 2013

Is Notification Center far too busy? Can you not find what you want at any point, and thus any semblance of usability for the drop-down menu has gone the way of the dodo? Well, we can help you de-clutter Notification Center with these handy tips!

Clear out individual apps:

Most apps' notifications will clear when you enter the app, but some, like Instagram, will not disappear. Thus, just pull down from the top status bar to access Notification Center, scroll to the app that's got too many notifications, tap the X to the right of the app's name, and then tap Clear. All these notifications will disappear and the app won't reappear until new notifications come in.

Disable notifications for an app entirely:

Do you really need to see notifications for that game you barely play? Well, to disable notifications entirely, go to Settings -> Notifications, and scroll down to the app you want to disable. From here, turn Notification Center off, and this will hide notifications from appearing in the drop-down menu, though they will still come in. If you want to disable them entirely, set Alert Style to None, and disable Badge App Icon and Sounds.

Reduce the number of items that appear in Notification Center:

It's also possible to just make an app take up fewer slots in the menu. Go to the app's page in the Notifications setting menu, and tap the Show menu. From here you can only show 1, 5, or 10 recent items. All notifications will still come in, but only that many recent ones will appear.

Use manual notification sorting:

So, you still want notifications to appear in Notification Center but maybe just want to have the important ones appear first? From the main Notifications settings menu, choose Manually under Sort Apps:, and then tap the Edit button in the top-right corner. You can now use the drag selector on the right side of an app's listing to drag it around in the list. Apps will always appear in the order you specify. Note that new apps always get added to the bottom of the list, so you must always sort them to your desired position yourself.

Disable widgets:

If you don't need to check stocks, think social media is for teenagers, or live in Texas and don't need to check the weather ever, you can disable each of the three built-in widgets by tapping on their entries in the Notifications settings and turning Notification Center to off.

Hopefully these tips have made Notification Center a much more useful place for you!

How To: Create Speed Dial Shortcuts in Favorites and on the Home Screen

Posted by Carter Dotson on April 22nd, 2013

Why should we ever have to look up the number for our favorite contacts ever again? We shouldn't ever have to, and thanks to the Favorites list and to some clever trickery with home screen shortcuts, it's possible to never have to memorize a phone number ever again!

The way to access Favorites is through the Phone app on iPhone, or FaceTime app on iPad or iPod touch.even if trying to FaceTime them. So open up the Phone app or FaceTime app and go to the Favorites tab.

Tap the + icon in the upper right corner. Your contact list should now be displayed. Tap on a contact to access their page. Now tap on the phone number or email address you want to add to Favorites.

Phone numbers will add a shortcut to call the person; email addresses will go to FaceTime. Note that each phone number and email address will appear separately in the list, along with the description for the phone or email address, so you can easily call the different numbers for a person. You can rearrange and delete by tapping Edit in the upper-left corner.

Note that this brings easy access to people for phone calls and FaceTime, it may make access too easy! Tapping on the person's name will start a phone or FaceTime phone call, so if you tap the button accidentally, be prepared to hit the "End Call" button immediately! It isn't possible to add a person to the list as an SMS/iMessage contact, but tapping the blue arrow to the right of their name (carefully, lest it start a call!) will call up their full contact card, where you can send them a message or email from that page.

Now, an even quicker way to call people or to send them a message is through home screen shortcuts. See, it's possible through URL shortcuts to call up different built-in apps: tel://1-800-692-7753 when pasted in to Safari would call up Apple's support hotline, and there's shortcuts for sms:// and facetime:// as well.

The easy way to set up a home screen shortcut for yourself is to do it through an App Store app - there are several, but OneTap does the job, with the ability to create shortcuts for calls, messages, FaceTime, and even Twitter. It can even set up custom user icons.

The shortcut, once on your home screen, briefly opens up Safari before completing the action you want.

Now, there are ways to do this yourself, but they're more complicated and they require the iPhone Configuration Utility, or other methods with HTML pages and URL redirection that just aren't worth your time.

Hopefully this guide helps you on your way to getting to contact the people you want to contact faster!

How To: Create Publicly-Shared Galleries With Shared Photo Streams

Posted by Carter Dotson on April 15th, 2013

Want to share your photos with your friends and family in an extremely easy way? There's a way to do it with Shared Photo Streams, to easily and automatically share photos with people. Start by using our guide to create a Shared Photo Stream. Once the Shared Photo Stream is created, tap on the blue arrow to enter the Edit Photo Stream screen. Now, it's possible to add a subscriber that can view the Photo Stream on Mac in iPhoto, on Windows with the iCloud Control Panel, or on their iOS device.

However, the easiest way to share photos is to create a public website from the Photo Stream. Turn the Public Website switch to on. Now, this creates a public website that will feature any photos that are in the Shared Photo Stream where users can see comments and download the photos for themselves. To share the link with someone else, tap the Share Link button. You can share the link through social networks, Mail, Messages, or by copying the link and pasting into the sharing method of your choice. Now, on the web view, the photos will be arranged by date, to see when a photo was uploaded.

To add a new photo into a Photo Stream, go to the photo in Camera Roll, tap on it, and then tap on the Share arrow. Tap on the Photo Stream icon, and you can add it to either an available Photo Stream or to a new one that can be created. When you add a photo, you can add a comment that will be displayed along with the photo in the web gallery. You can add multiple photos by tapping Edit to multi-select the photos, and sharing them as normal. Note that any comments added will be for all the selected photos.

To delete a photo from the Photo Stream, open up the Shared Photo Stream in Photos, and tap the Edit button. Select the photos to be deleted, and tap Delete. While this will prevent them from being viewable in the gallery any more, those with the link may have saved them separately. Remember: the things you share publicly never truly go away. These tips should make it easier to share photos straight from your iOS device in an easy-to-access web gallery. Thanks to this guide for inspiring these tips.