
148 Things You Can (Should) Do With Your iDevice – The Very Basics Pt. 2
For the first 23 things to do, check out the rest of the article at: The Very Basics Pt. 1 (1-23)
Before we get to the settings menu, I forgot to mention one of the most important things that you will need to know for sure on your iDevice.
[caption id="attachment_24081" align="alignright" width="200" caption="This is an example of too much zoom. Wait... is that my car?"]

The Daunting Settings Menu
25. Use Your iPhone On A Plane - "*Ding* You can now turn on all electronic items." Everyone has heard this, but you now have a cell phone... and cell phones are absolutely a no-no on planes. Avoid this by going into the 'Settings' app and flicking the 'Airplane Mode' tab to 'ON'. Now you have the equivalent of an iPod Touch.
26. Turn On WiFi - This is absolutely critical if you want to download apps over 10MB or want to play online games at optimal speeds. Be sure to turn WiFi on, and then pick your network, or an unlocked network in your area. On the flip side, know that you can still use the internet when you're not in a WiFi zone. 3G really does work quite well, as long as you aren't in a big city.
27. Change Your Ringtone - I know you want to change that ringtone... that boring ringtone that comes with the phone just doesn't work for me. To change it, go to the 'Sounds' menu (all within 'Settings' of course), click on 'Ringtone', and then have at it. You can also change your text message ringtone under the 'New Text Message' menu.
28. Save Your Battery, Lower The Brightness - Under the brightness tab, you can lower your brightness (shocker). Lowering it down a bit can significantly raise your battery life.
[caption id="attachment_24082" align="alignleft" width="200" caption="Internet tethering... where did that come from?"]
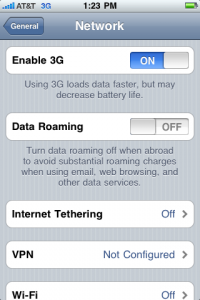
30. Quick Troubleshooting Tip - Let's say that your phone is dropping calls right and left, and now your last resort before insanity is to see the Genius Bar. You think that they are going to do some kind of voodoo, but all they do, at least at first, is reset the network settings. To do this yourself, go to the 'General' tab, scroll all the way down to the 'Reset' tab, and click 'Reset Network Settings'. If you really want to get crazy you can 'Reset All Settings', but it's usually more hassle then it's worth.
31. Change The Wallpaper - No, you cannot change the permanent black background, but you can change that Earth picture in the unlock screen. To do this, click on the 'Wallpaper' tab and then select away.
Whew, now we're done with the Settings menu. There's a bunch more, but I didn't want to get really nit picky, at least not yet... we're still going over the basics.
Included Apps
32. Move Apps Off the Main Screen - Ha, I hope you like what I did there. Most of the included apps are so straightforward that explaining them all would just be a waste of my time. More importantly, you should know how to move them off the main screen, because deleting them is forbidden by Apple. First, act like you are going to move the app around the page (see #8), but this time, drag it to the far side of the page until it moves into the next page.
33. Find Where You Are - Fine, I suppose that I do use the 'Maps' app quite a bit. Assuming you are using a newish iPhone, you have the ability to track yourself via GPS. To do this, go into the 'Maps' app and click on the target looking button in the bottom left. It'll take a second, but when it's done you will see exactly where you are on a map.
34. See a Satellite View - Want to see what the terrain looks like while you are getting directions? Click on the button on the bottom right within the "Maps" app and you'll get some options. Choose 'Satellite' if you want to, but I would recommend the 'Hybrid' mode for the ease of use.
35. Get Directions - To get directions, just hit the 'Directions' tab within maps. You can either type in two places here, or you can select 'Current Location' and then end somewhere else. When you are done, just hit 'Done'. If you change your mind as to where you want to go, click on the 'Edit' button on the top left. You can also see how long the trip will take via mass transit or by foot by clicking on the corresponding buttons at the top of the screen.
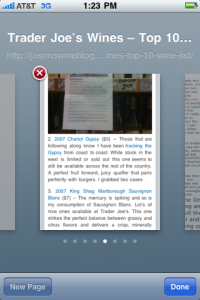
[caption id="attachment_24083" align="alignright" width="200" caption="I have 8 tabs open... don\'t be like me."]
37. Add A Bookmark - Just like adding anything else, just look for the '+'.
38. Use Tabs - Tabs are a great way to go on different websites at the same time. To do this on your iDevice, just click on the button on the bottom right in the Safari app. It'll give you a slide-able menu to navigate, while also giving you a 'New Page' button to click on. Fair warning, you have 8 tabs total, and when they are open, your iDevice does take a performance hit. Don't have 9 open at all times. To get rid of one, just click on the 'x' on the top left of the website image.